Refactor a BMI Calculator with JavaScript Functions

Take a working BMI calculator and make it better with JavaScript functions and conditionals. Learn why functions exist by fixing code that needs them.

14 lessonsAbout 39 minFree, no account needed

What you learn

  • Writing JavaScript functions
  • if and else conditionals
  • Refactoring working code

Lesson 1 of 14 · 2 min

What you are building

Today you build version 2 of your BMI calculator. Instead of popup prompts, the user types their weight and height into text inputs on the page, and the BMI appears right there.

Prefer to follow along with a walkthrough? Watch it here, or open the Day 4 video in a new tab.

Day 4 walkthrough: Build a better BMI calculator

What you are learning:

  • how to add text inputs;
  • how to use the DOM to control the website's logic;
  • how to build a cleaner, more interactive BMI calculator.

This is the day your page starts to feel like a real, interactive app.

This lesson has 1 quiz in the portal, where you tick off each step and get feedback on the code you write. Do this lesson free.
Lesson 2 of 14 · 3 min

Set up your Better BMI project

Set up a fresh StackBlitz project:

  1. Click New Project and choose the HTML, CSS, JS project.
  2. Rename it Better BMI.
  3. Delete page2.html.
  4. Open Settings and change the compile trigger to Save.

Just like Day 3, add the avocado (or any square image) and name it avocado-exercise so it can appear at the top of your calculator.

This lesson has a task checklist in the portal, where you tick off each step and get feedback on the code you write. Do this lesson free.
Lesson 3 of 14 · 3 min

The design: a form

Before we code, let's read the design.

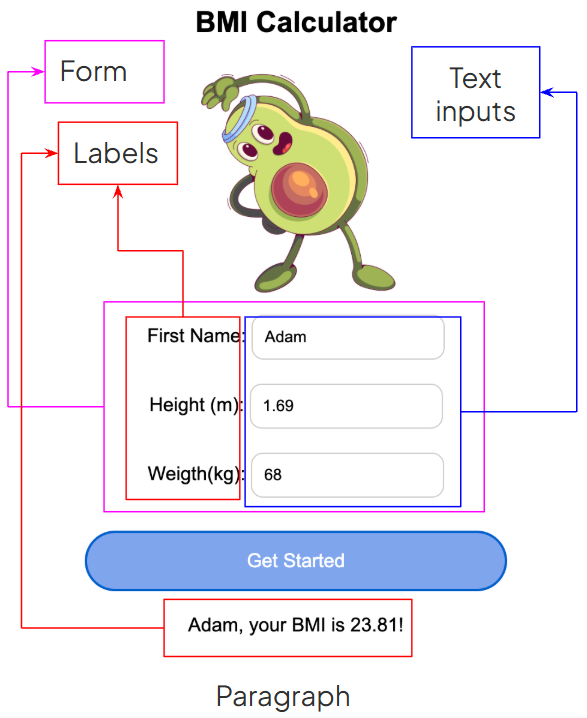
The design broken down into form, labels, text inputs, and paragraph

The page has four kinds of pieces:

  • Labels: the text beside each input, like "First Name:".
  • Text inputs: the boxes the user types into.
  • A paragraph: where the BMI result will appear.
  • A form: a container that groups the labels and inputs together.

A form is simply a way to collect information from the user. Next, let's build it in code.

This lesson has 1 quiz in the portal, where you tick off each step and get feedback on the code you write. Do this lesson free.
Lesson 4 of 14 · 3 min

Build the form

Haven't added the avocado image yet?

Day 4 continues from your Day 3 Simple BMI project. If the image is missing:

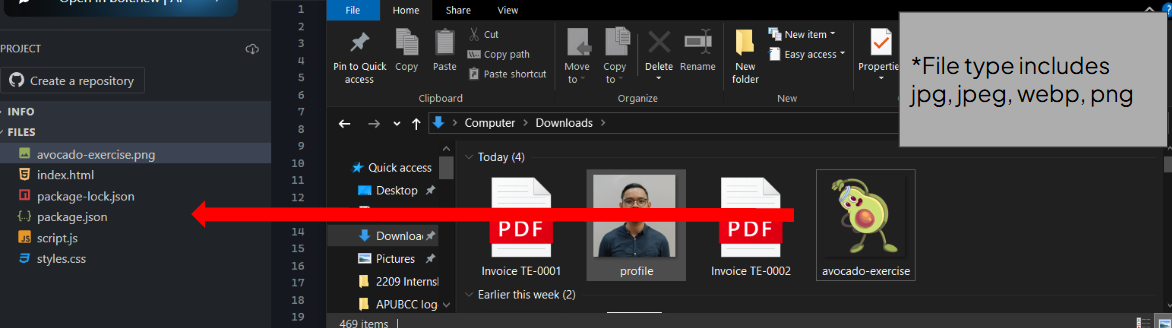
  1. Download the avocado image.
  2. Save it as avocado-exercise.jpeg.
  3. Drag it into the project's root folder, beside index.html.

Dragging the avocado image into the project

In index.html, update the code to this:

<body>
  <div>
    <h1>BMI Calculator</h1>
    <img src="avocado-exercise.jpeg" height="200" alt="Avocado exercising" />
    <!-- Add the form here -->
    <form>
      <label for="firstName">First Name:</label>
      <input type="text" id="firstName" />
      <br />
      <label for="height">Height (m):</label>
      <input type="number" id="height" />
      <br />
      <label for="weight">Weight (kg):</label>
      <input type="number" id="weight" />
    </form>
    <button onclick="calculateBMI()">Get started!</button>
    <!-- Add the paragraph here -->
    <p id="result"></p>
  </div>
  <script src="script.js"></script>
</body>

In styles.css, update the code as well:

body {
  display: flex;
  flex-direction: column;
  align-items: center;
  font-family: Arial, Helvetica, sans-serif;
  text-align: center;
}

/* Add this rule */
label {
  font-size: 16px;
}

/* Add this rule */
input {
  padding: 10px;
  margin-top: 10px;
  margin-bottom: 10px;
  border-radius: 10px;
  border: 1px solid #ccc;
}

button {
  background-color: #80a6ed;
  border: none;
  color: white;
  padding: 15px;
  width: 350px;
  text-decoration: none;
  font-size: 16px;
  border-radius: 30px;
  cursor: pointer;
}

/* Add this rule */
#result {
  margin-top: 20px;
}

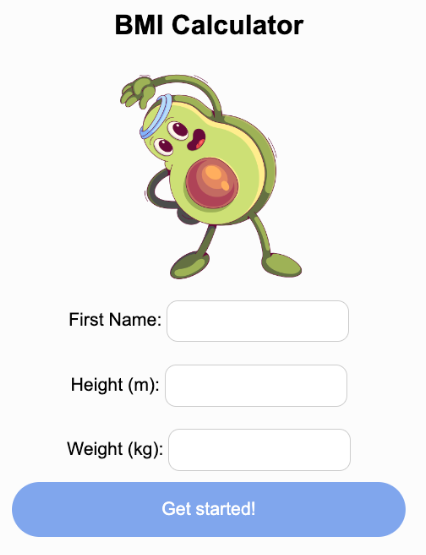
Save it and run the code. It should look like this:

The BMI calculator with a form of text inputs

This lesson has 1 quiz in the portal, where you tick off each step and get feedback on the code you write. Do this lesson free.
Lesson 5 of 14 · 3 min

The form and label tags

Two tags do the grouping.

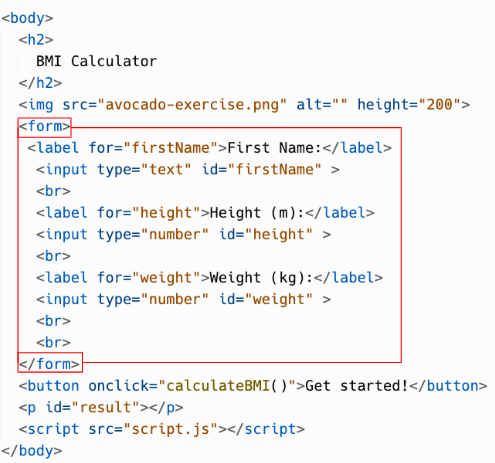
<form> marks the start and end of the form. Inside it we usually put labels and inputs.

Form tag guide

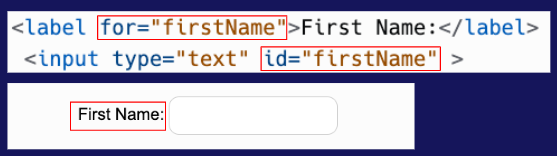
<label> is the text paired with an input. Its for attribute should match the input's id:

<label for="firstName">First Name:</label>
<input type="text" id="firstName" />

Input label guide

Why bother matching them? Accessibility. The link lets screen readers and other assistive tools announce what each input is for, so people who cannot see the form can still use it.

This lesson has 1 quiz in the portal, where you tick off each step and get feedback on the code you write. Do this lesson free.

Lesson 6 of 14 · 3 min

Text and number inputs

The <input> tag is a box the user types into.

  • type="text" creates a simple text box.
  • id identifies the input, so CSS and JavaScript can find it later.

For height and weight, we want numbers only, so we use type="number":

<input type="number" id="height" />

Numeric input field with spin buttons

This filters the input to accept only numbers, which stops someone typing letters into a field that should hold a measurement.

This lesson has 1 quiz in the portal, where you tick off each step and get feedback on the code you write. Do this lesson free.
Lesson 7 of 14 · 3 min

Line breaks and styling

<body>
  <h2>
    BMI Calculator
  </h2>
  <img src="avocado-exercise.png" alt="" height="200">
  <form>
    <label for="firstName">First Name :< /label>
    <input type="text" id="firstName" >
    <br>
    <label for="height">Height (m) :< /label>
    <input type="number" id="height" >
    <br>
    <label for="weight">Weight (kg) :< /label>
    <input type="number" id="weight" >
    <br>
    <br>
  </form>
  <button onclick="calculateBMI()">Get started!</button>
  <p id="result"></p>
  <script src="script.js"></script>
</body>

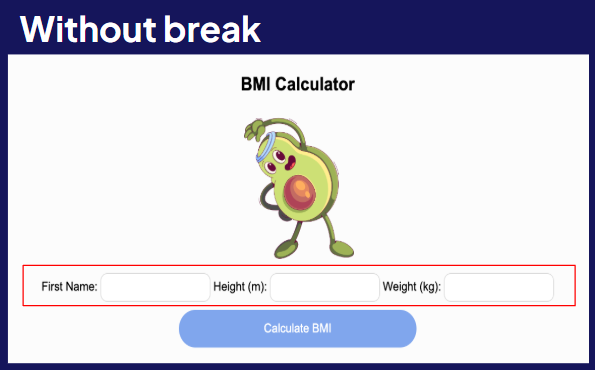
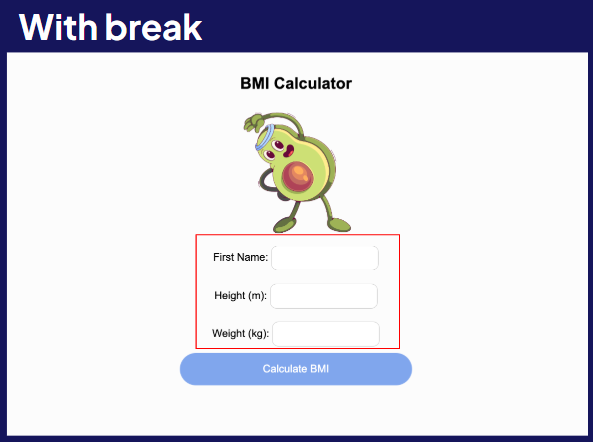
Notice the <br /> tags between the inputs. <br> is short for break, and it adds a line break so each label and input sits on its own line instead of running together.

Without break With break


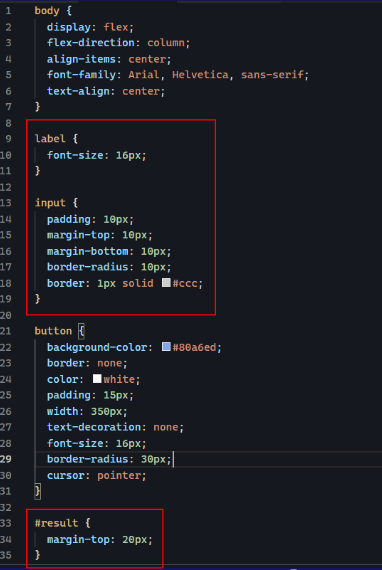
Now the CSS. Three things to know:

CSS code for label, input, and paragraph with id result

  • font-size controls the size of your text.
  • margin adds space outside an element, so things are not cramped.
  • #result is how you style by id. The # means "the element with this id". So #result styles the paragraph with id="result".

Ids are how we point at one specific element, both in CSS and, next, in JavaScript.

This lesson has 1 quiz in the portal, where you tick off each step and get feedback on the code you write. Do this lesson free.
Lesson 8 of 14 · 3 min

From popups to on-page results

Day 3 used popups. Today the answer appears on the page. Update script.js and run it:

function calculateBMI() {
  // Update the 3 lines below
  const firstName = document.getElementById("firstName").value;
  const height = document.getElementById("height").value;
  const weight = document.getElementById("weight").value;

  const bmi = weight / height ** 2;

  // Add these 2 lines below
  const result = document.getElementById("result");
  result.innerHTML = `${firstName}, your BMI is ${bmi.toFixed(2)}!`;
}

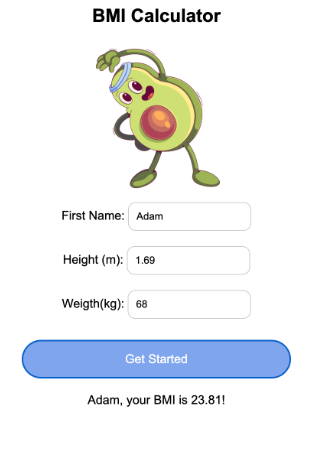
Type a name, height, and weight, then click the button:

The working calculator showing Adam, your BMI is 23.81!

The result now appears in the paragraph, no popups. Let's unpack how that works, because this pattern, read inputs, compute, update the page, is behind almost every interactive site.

This lesson has 1 quiz in the portal, where you tick off each step and get feedback on the code you write. Do this lesson free.
Lesson 9 of 14 · 3 min

The DOM: getElementById

DOM stands for Document Object Model. In the DOM, we call the whole website the document.

The HTML input has an id that uniquely identifies it:

<input type="text" id="firstName">

The document has functions, and one of the most useful is getElementById(). Use it to find that input and store the element in a variable:

const firstNameInput = document.getElementById("firstName");

What do we get?

If we print firstNameInput in the console:

console.log(firstNameInput);

// Output:
<input type="text" id="firstName">

getElementById() returns the complete element with id="firstName", not the text entered inside it.

It is the exact input you labelled earlier. Once JavaScript has hold of the element, it can read from it and change it.

This is why every input has an id: it is the name JavaScript uses to grab that specific box.

Watch this explanation to see how JavaScript uses the DOM to read and change a webpage:

What is the DOM?

This lesson has 1 quiz in the portal, where you tick off each step and get feedback on the code you write. Do this lesson free.
Lesson 10 of 14 · 3 min

Reading input values

Grabbing the element is step one. To get what the user typed, read its .value:

const firstName = document.getElementById("firstName").value;

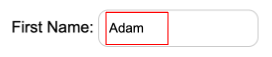
If the user typed "Adam" into that box, firstName is now "Adam".

Type Adam as the input value

The same pattern reads the height and weight boxes:

const height = document.getElementById("height").value;
const weight = document.getElementById("weight").value;

console.log(height);
console.log(weight);

// If the user entered 1.75 and 65, the console shows:
// 1.75
// 65

The console prints the values currently entered in those two input boxes.

Three inputs, three answers, all read straight from the page instead of from popups.

This lesson has 1 quiz in the portal, where you tick off each step and get feedback on the code you write. Do this lesson free.
Lesson 11 of 14 · 3 min

Update the page with innerHTML

Reading inputs shows how DOM gets data in. innerHTML is how we put content back out onto the page.

Your result paragraph starts empty:

<p id="result"></p>

Before: the paragraph is empty, so no result text appears in the browser.

Its innerHTML (the content inside the tags) is currently blank. Using the DOM, we can set it, just like assigning a variable:

const result = document.getElementById("result");
result.innerHTML = "Your BMI is ready!";

After: the browser now displays:

Your BMI is ready!

The paragraph is now equivalent to:

<p id="result">Your BMI is ready!</p>

Whatever you assign to innerHTML becomes the visible content of that paragraph.

Next, we will build a smarter message than a plain string.

This lesson has 1 quiz in the portal, where you tick off each step and get feedback on the code you write. Do this lesson free.

Lesson 12 of 14 · 3 min

Template literals

We want the message to include the user's name and BMI. For that we use a template literal, a special kind of string.

Two things make it special:

  • It uses backticks, not straight quotes.
  • It can hold placeholders written as ${ }, which get replaced with real values.
result.innerHTML = `${firstName}, your BMI is ${bmi}!`;

If firstName is "Adam" and bmi is 23.81, this becomes:

Adam, your BMI is 23.81!

Placeholders let you slot live values straight into your text, no clunky + joins needed.

This lesson has 1 quiz in the portal, where you tick off each step and get feedback on the code you write. Do this lesson free.

Lesson 13 of 14 · 2 min

Round with toFixed()

A raw BMI can have many decimal places, like 25.6491.... That looks messy, so we round it with .toFixed().

.toFixed(2) rounds a number to a fixed number of decimal places, here 2:

result.innerHTML = `${firstName}, your BMI is ${bmi.toFixed(2)}!`;

So a BMI of 25.6491 becomes 25.65. Cleaner, and much friendlier to read.

That completes the calculator: read the inputs, compute the BMI, round it, and show it on the page.

This lesson has 1 quiz in the portal, where you tick off each step and get feedback on the code you write. Do this lesson free.

Lesson 14 of 14 · 2 min

Ship your Better BMI

🎉 Congratulations! You have created a web application.

Today you made a page genuinely interactive: form inputs, the DOM to read and update the page, template literals, and toFixed() for a clean result. That read-compute-update loop is the heart of front-end development.

Your project is live at the URL in the preview's address bar. Open it in a new tab to see it working, and share it in the community so others can try it.

If you get stuck, compare with the full code example.

Day 4 completed!

This lesson has a task checklist in the portal, where you tick off each step and get feedback on the code you write. Do this lesson free.

Reading it is step one. Doing it is the point.

Everything above is the full teaching content, free to read. The same lessons in Sigmo add 12 quizzes that mark themselves, 2 hands-on checklists, and an AI coding buddy that answers questions about the exact line you are stuck on. No card needed.

Do this course free

You just read it. Now go build it.

The free trial puts you inside Sigmo, the learning portal our students use every day, with the quizzes, the checklists and an AI buddy on every lesson. No card needed.