Build a BMI Calculator with JavaScript

Your first JavaScript project: a BMI calculator that takes real user input and shows a result. Learn variables, data types, and doing maths in code.

15 lessonsAbout 43 minFree, no account needed

What you learn

  • JavaScript variables
  • Data types and numbers
  • Reading user input

Lesson 1 of 15 · 2 min

What you are building

Today you build a BMI calculator: it asks the user for their weight and height, then shows their BMI back to them.

Prefer to follow along with a walkthrough? Watch it here, or open the Day 3 video in a new tab.

Day 3 walkthrough: Build a simple BMI calculator

What you are learning:

  • data types such as text and numbers;
  • how to store data in variables;
  • the basics of functions;
  • how to build the BMI calculator itself.

Days 1 and 2 were HTML and CSS. Today you meet JavaScript, the language that makes a page actually do things.

This lesson has 1 quiz in the portal, where you tick off each step and get feedback on the code you write. Do this lesson free.
Lesson 2 of 15 · 3 min

Set up your Simple BMI project

Set up a fresh StackBlitz project:

  1. Click New Project and choose the HTML, CSS, JS project.
  2. Rename it Simple BMI.
  3. Delete page2.html (we will not use it).
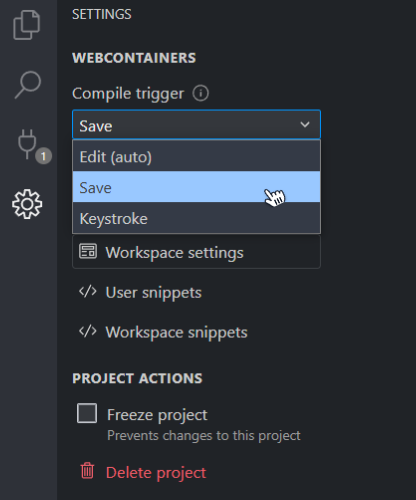
  4. Open Settings and change the compile trigger to Save, so the preview updates when you save. Compile trigger in settings

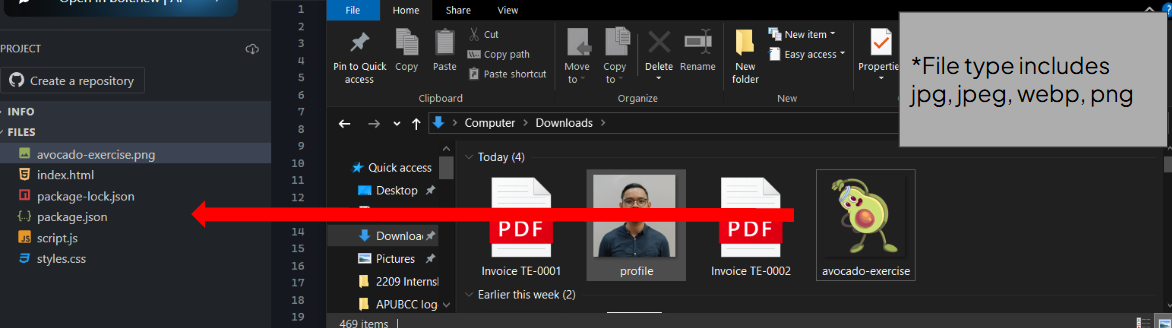
Then add today's mascot. Download this avocado image, then drag it into the project and name it avocado-exercise, for example avocado-exercise.jpeg.

  • Place it beside index.html.
  • Keep its extension and match the full name in src.
    • For example, avocado-exercise.png uses src="avocado-exercise.png".

Dragging the avocado image into the project

This lesson has a task checklist in the portal, where you tick off each step and get feedback on the code you write. Do this lesson free.
Lesson 3 of 15 · 3 min

Build the page

Let's build the page. In index.html, update the code to this:

<!DOCTYPE html>
<html lang="en">
  <head>
    <title>BMI Calculator</title>
    <meta charset="UTF-8" />
    <meta name="viewport" content="width=device-width" />
    <link rel="stylesheet" href="styles.css" />
  </head>

  <body>
    <div>
      <h1>BMI Calculator</h1>
      <img src="avocado-exercise.jpeg" height="200" alt="Avocado exercising" />
      <p>
        *Prompt dialogs will appear to ask for your height (in metres) and weight (in kg).*
      </p>
      <button>Get started!</button>
    </div>
    <script type="module" src="script.js"></script>
  </body>
</html>

In the styles.css, update the code to this:

body {
  display: flex;
  flex-direction: column;
  align-items: center;
  font-family: Arial, Helvetica, sans-serif;
  text-align: center;
}

p {
  width: 350px;
}

button {
  background-color: #80a6ed;
  border: none;
  color: white;
  padding: 15px;
  width: 350px;
  text-decoration: none;
  font-size: 16px;
  border-radius: 30px;
  cursor: pointer;
}

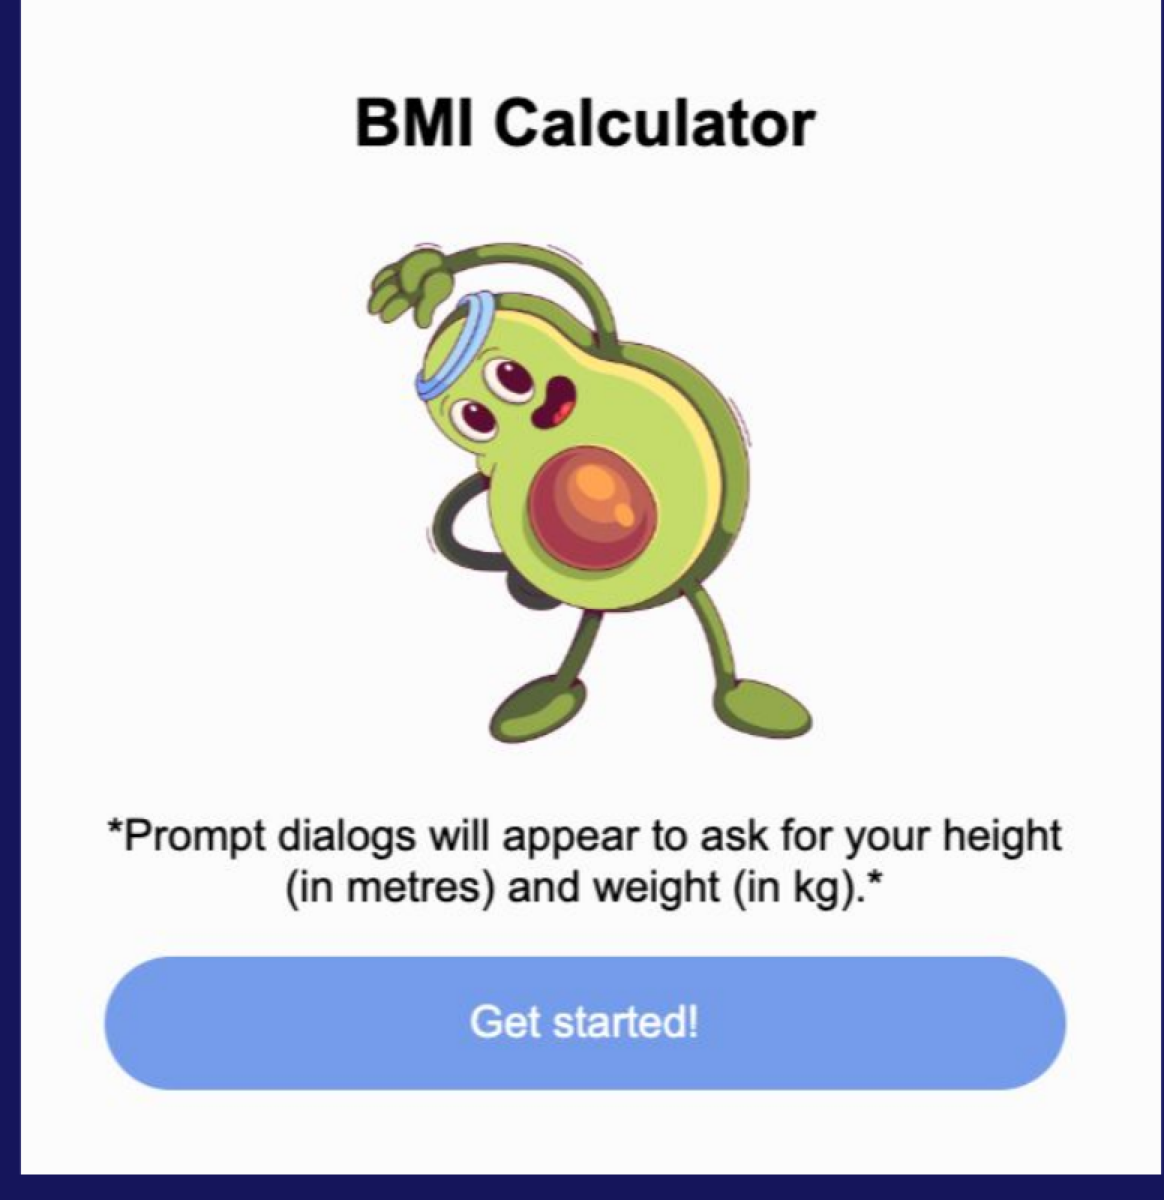
Save the code and run it. Your page should look like this:

The BMI calculator page with the avocado and a Get started button

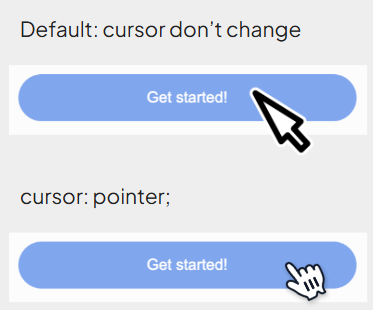
💡 Tip: Show users what is clickable

  • A <button> does not show the familiar hand cursor on hover by default.
  • Add cursor: pointer; to make the cursor change when someone hovers over it.

Cursor pointer guide

This lesson has 1 quiz in the portal, where you tick off each step and get feedback on the code you write. Do this lesson free.
Lesson 4 of 15 · 3 min

Two new tags: button and script

Two tags on that page are new.

<button>Get started!</button>

<button> creates a clickable button that can trigger JavaScript. So what is the difference between <a> and <button>?

  • <a> creates a link to another page (and we can style it to look like a button, as on Day 2).
  • <button> creates a button we run JavaScript with.
<script src="script.js"></script>

<script> connects a JavaScript file to your HTML. Its src attribute is the location of the file, here script.js. (The name script.js is just a convention.) That JS file is where the logic of your site lives, in this case, the BMI calculation.

This lesson has 1 quiz in the portal, where you tick off each step and get feedback on the code you write. Do this lesson free.
Lesson 5 of 15 · 3 min

What is JavaScript?

JavaScript (JS) was created in 1995, and its first version was built in just 10 days. It is famous for being a little quirky, but it is the most popular web language, because it is the only language that runs in the web browser.

And it is not just for websites. JavaScript can build:

  • 🌐 Web apps (HTML/CSS/JS)
  • 📱 Mobile apps (React Native)
  • 🎮 Games (Phaser.io)
  • 🖥️ Desktop apps (Electron)
  • 🔧 Servers (Node.js)
  • 📊 Data analytics (D3.js)
  • 🤖 Machine learning (TensorFlow.js)

Learn JavaScript well and a huge range of software opens up to you. Let's start with the basics.

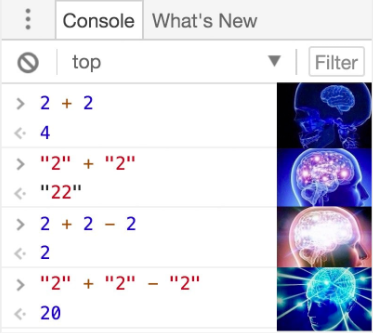
Fair warning: JS has its quirks. Mix text and numbers and it can surprise you. 2 + 2 is 4, but "2" + "2" is "22" (quotes make it text, so it glues them together instead of adding). Weird at first, but the rules are learnable, and soon you'll spot these a mile off.

JavaScript quirk: 2 + 2 is 4, but "2" + "2" is "22"

This lesson has 1 quiz in the portal, where you tick off each step and get feedback on the code you write. Do this lesson free.
Lesson 6 of 15 · 3 min

Variables: storing data

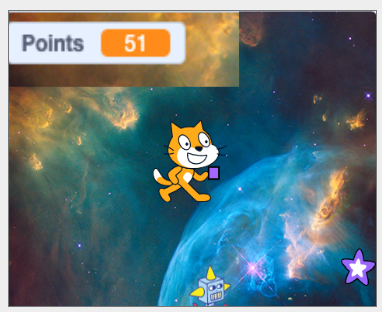
Ever played a game and seen your score? The game remembers it using a variable.

Variable example using game

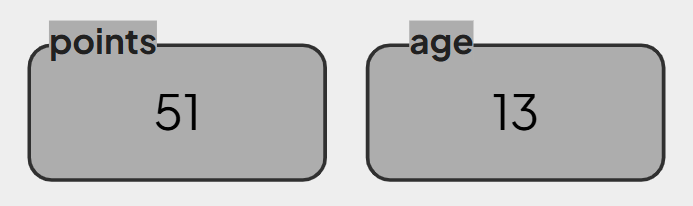
Think of a variable as a box, with a name, that stores a value. For example, a box named points that holds the number 51:

const points = 51;
const age = 13;

Visualization of variables

Two things to note about names:

  • Use camelCase: the first word is lowercase, and each following word starts with a capital, like previousYear.
  • Give names that describe what they hold, so your code reads clearly.

Next, let's store some values and print them out.

This lesson has 1 quiz in the portal, where you tick off each step and get feedback on the code you write. Do this lesson free.
Lesson 7 of 15 · 3 min

The console and console.log()

When building, developers need to check values, bugs, and errors. We do that with developer tools, and the most-used one is the console.

The console is a way to interact with the JavaScript you have written. Think of it like the StackBlitz editor, but available on every website.

Think of console as a book with several instructions:

  • console.log() logs (shows) a value in the console.
  • console.error() shows an error message.
  • console.warn() shows a warning.

Add this to script.js and save:

const weight = 65;
const height = 1.75;
console.log(weight);
console.log(height);

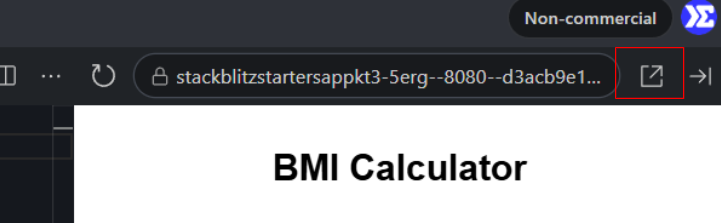
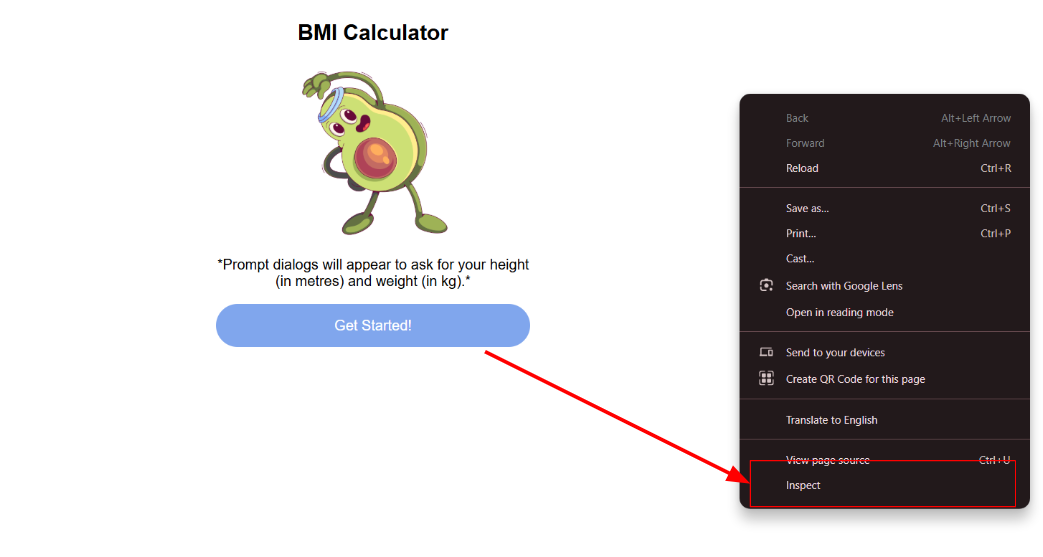
Open the preview in its own tab:

Open preview

Toggle the developer tools:

Toggle browser inspect tools

Open the Console. Your numbers appear there.

Open the console output

This lesson has 1 quiz in the portal, where you tick off each step and get feedback on the code you write. Do this lesson free.
Lesson 8 of 15 · 2 min

Functions are recipes

A function is like a recipe: a set of steps to do something.

JavaScript comes with functions built in to do certain jobs. You have already used one: console.log() is a function that prints a value.

Over the next steps you will use more built-in functions, prompt() and alert(), and then write your own. The idea is always the same: a named set of steps you can run whenever you need it.

This lesson has 1 quiz in the portal, where you tick off each step and get feedback on the code you write. Do this lesson free.
Lesson 9 of 15 · 3 min

Ask the user with prompt()

prompt() is a function that shows a message and returns whatever the user types. Update script.js:

const weight = prompt("What is your weight? (kg)"); // Update the code here
const height = 1.75;
console.log(weight);
console.log(height);

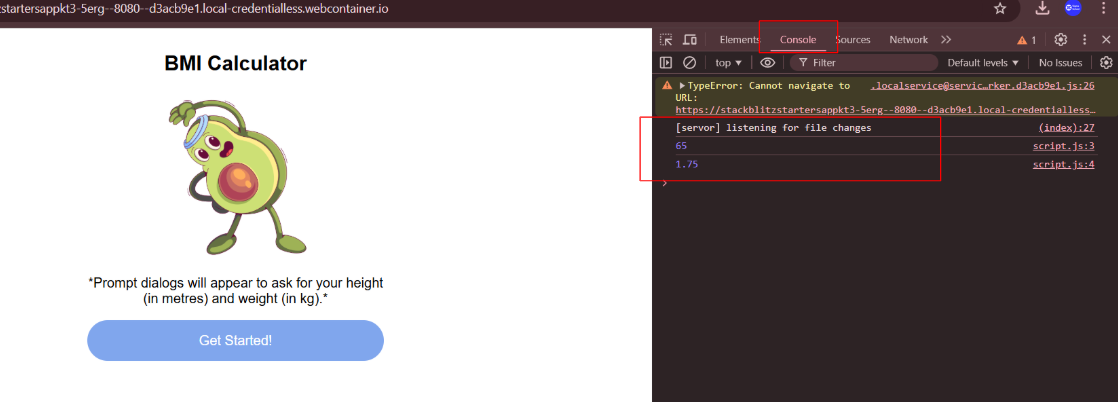
Save and run. A prompt dialog appears. Type a weight and press OK.

A prompt dialog asking for weight

Toggle the developer tools and you will see the console print your weight.

For example, if you enter 65, the console shows:

65
1.75

Notice the message is wrapped in "inverted commas". In JavaScript, text wrapped in quotes is called a string. Strings can be stored in variables too, like const firstName = "Haris";.

const firstName = 'Haris'; // Add this
const weight = prompt("What is your weight? (kg)");
const height = 1.75;
console.log(firstName); // Add this
console.log(weight);
console.log(height);

With firstName set to "Haris" and a weight of 65, the console shows:

Haris
65
1.75

This lesson has 1 quiz in the portal, where you tick off each step and get feedback on the code you write. Do this lesson free.
Lesson 10 of 15 · 3 min

Collect name, weight, and height

To calculate a BMI, we need three answers from the user. Add a prompt() for each, saving the answer in its own variable:

const firstName = prompt("What is your first name?"); // Update this
const weight = prompt("What is your weight? (kg)"); // Update this
const height = prompt("What is your height? (metres)");
console.log(firstName);
console.log(weight);
console.log(height);

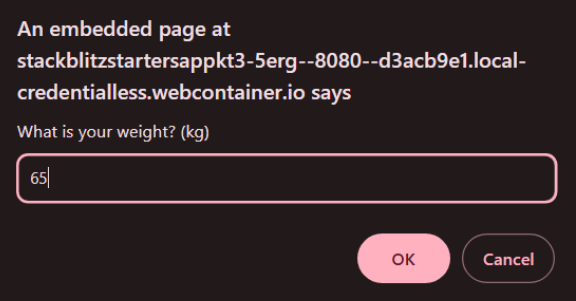
Save and run. Three dialogs appear, one after another, each storing the user's answer. Now we have everything we need to do the maths.

Prompt challenge expected output

This lesson has a task checklist in the portal, where you tick off each step and get feedback on the code you write. Do this lesson free.
Lesson 11 of 15 · 3 min

Calculate the BMI

You can use variables in maths. JavaScript has these operators:

  • Addition +
  • Subtraction -
  • Multiplication *
  • Division /
  • Power of **

BMI is weight divided by height squared (height to the power of 2).

Update the code:

const firstName = prompt("What is your first name?");
const weight = prompt("What is your weight? (kg)");
const height = prompt("What is your height? (metres)");
const bmi = weight / height ** 2; // Add this
console.log(firstName);
console.log(weight);
console.log(height);

For example, a weight of 80 and height of 2 gives 80 / (2 ** 2), which is 80 / 4, which is 20.

This lesson has 1 quiz in the portal, where you tick off each step and get feedback on the code you write. Do this lesson free.
Lesson 12 of 15 · 3 min

Show the result with alert()

alert() is another function that shows a message, this time as a popup. Use it to tell the user their result:

const firstName = prompt("What is your first name?");
const weight = prompt("What is your weight? (kg)");
const height = prompt("What is your height? (metres)");
const bmi = weight / height ** 2;
console.log(firstName);
console.log(weight);
console.log(height);
alert(firstName + ' your bmi is ' + bmi + '!'); // Add this

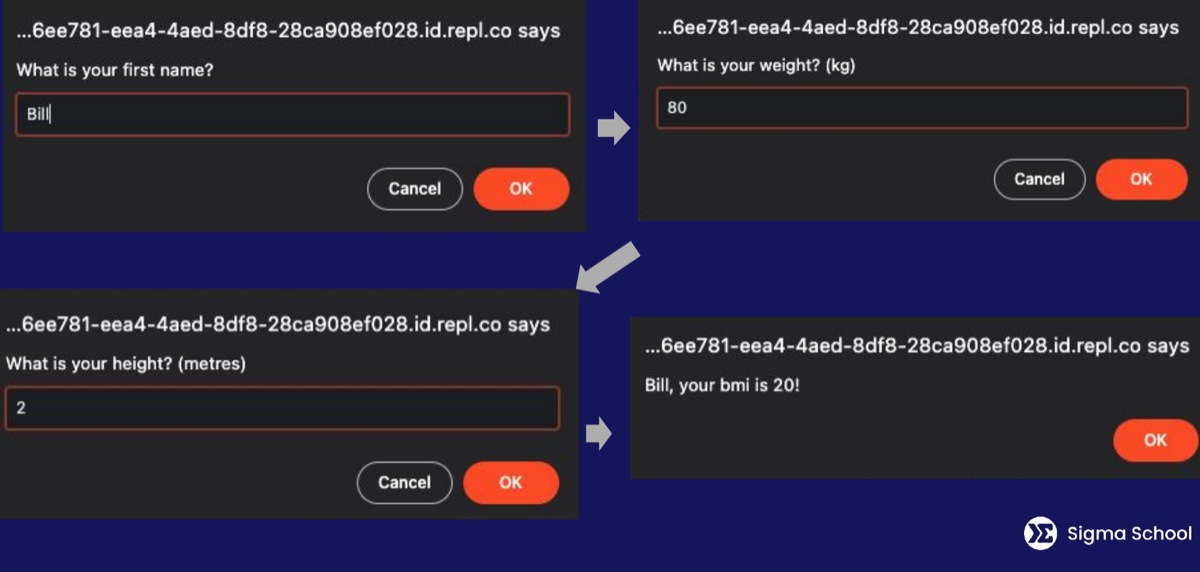
The + here joins pieces of text and values together into one message. If firstName is "Bill" and bmi is 20, the alert reads: Bill, your bmi is 20!

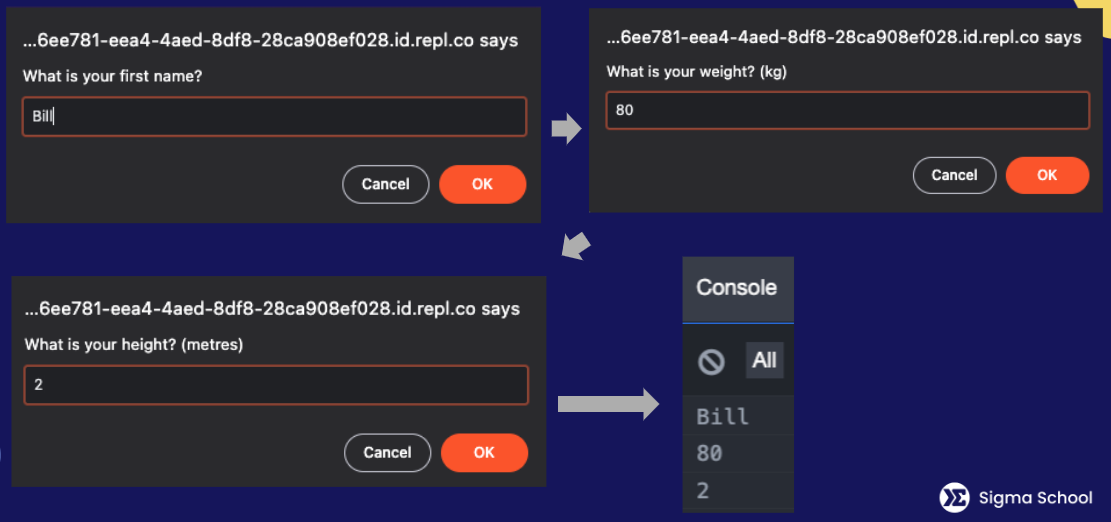
Here is the full journey the user goes through:

The prompt dialogs followed by the BMI result alert

This lesson has 1 quiz in the portal, where you tick off each step and get feedback on the code you write. Do this lesson free.
Lesson 13 of 15 · 4 min

Connect the button to a function

Right now the calculation runs the moment the page loads, not when the button is clicked. We fix that by wrapping the logic in a function and running it on click.

In script.js, put all your steps inside a function named calculateBMI:

function calculateBMI() {
  const firstName = prompt("What is your first name?");
  const weight = prompt("What is your weight? (kg)");
  const height = prompt("What is your height? (metres)");
  const bmi = weight / height ** 2;
  console.log(firstName);
  console.log(weight);
  console.log(height);
  alert(firstName + ", your bmi is " + bmi + "!");
}

Now nothing happens, and that is expected. Buying a recipe does not bake cookies; you have to follow it. In the same way, defining a function does not run it, you have to call it.

Wire the button to call the function. In index.html, add an onclick:

<button onclick="calculateBMI()">Get started!</button>

Save, click the button, and the dialogs appear. You built a working BMI calculator!

This lesson has 1 quiz in the portal, where you tick off each step and get feedback on the code you write. Do this lesson free.
Lesson 14 of 15 · 3 min

The anatomy of a function

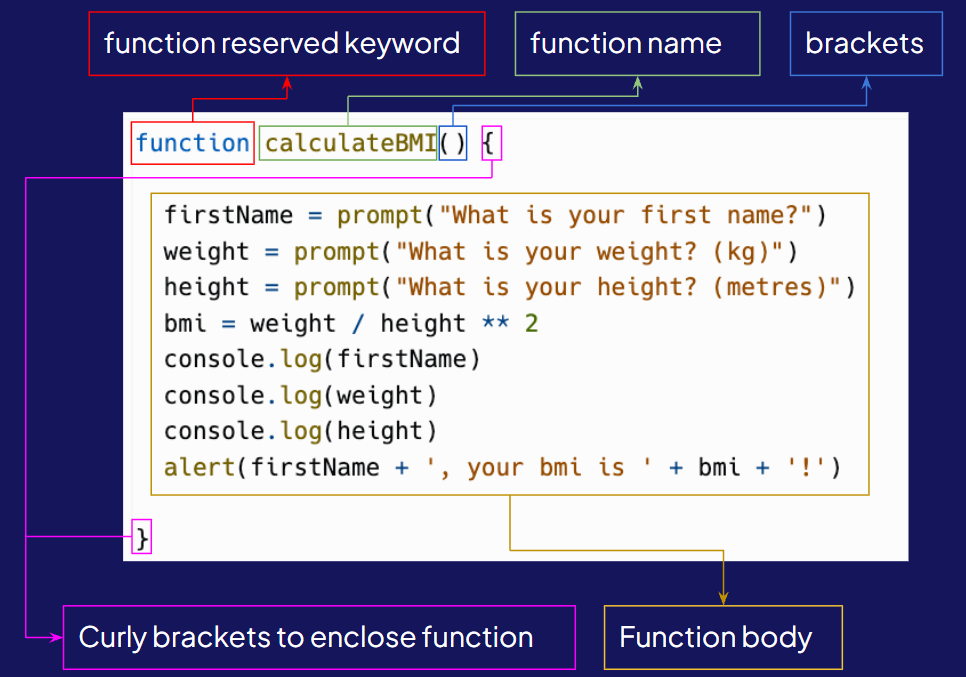
Let's name the parts of the function you just wrote:

function calculateBMI() {
  // function body: the steps
}
  • function is a reserved keyword that starts a function.
  • calculateBMI is the name.
  • () are the brackets (they can hold inputs, called parameters).
  • { } the curly brackets hold the function body, the steps.

Function definition

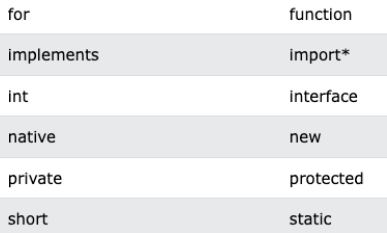
Reserved keywords are words JavaScript uses for itself, so you cannot use them as names. Examples: function, if, else, return.

List of reserved keywords

Naming matters. Like recipes, name functions clearly:

  • ❌ Bad: cCI, calcComInt
  • ✅ Good: calculateCompoundInterest

Parameters are like ingredients in a recipe. Our calculateBMI does not need any right now, so its brackets are empty. To run a function, you call it, as the button does with onclick="calculateBMI()".

This lesson has 1 quiz in the portal, where you tick off each step and get feedback on the code you write. Do this lesson free.
Lesson 15 of 15 · 2 min

Ship your BMI calculator

🎉 Congratulations! You have created a BMI application.

You met your first JavaScript today: variables to store data, strings and numbers, prompt() and alert(), math operators, the console, and functions wired to a button. That is the core of how every interactive site works.

Your project is live at the URL in the preview's address bar. Copy it and open it in a new tab to see your calculator running.

If you get stuck, compare with the full code example.

Day 3 completed!

This lesson has a task checklist in the portal, where you tick off each step and get feedback on the code you write. Do this lesson free.

Reading it is step one. Doing it is the point.

Everything above is the full teaching content, free to read. The same lessons in Sigmo add 12 quizzes that mark themselves, 3 hands-on checklists, and an AI coding buddy that answers questions about the exact line you are stuck on. No card needed.

Do this course free

You just read it. Now go build it.

The free trial puts you inside Sigmo, the learning portal our students use every day, with the quizzes, the checklists and an AI buddy on every lesson. No card needed.